5 min read
Heroku Alternative in Europe: Migrate to Scalingo in minutes
You love Heroku for its ease of use and versatility — but now you’re looking for a European alternative that gives you more control, transparency, and data sovereignty. Welcome to Scalingo!

You love Heroku for its ease of use and versatility — but now you’re looking for a European Heroku alternative that gives you more control, transparency, and data sovereignty? Welcome to Scalingo!
Many of our customers, including Le Wagon and Yespark, have already made the move from Heroku to Scalingo. They wanted to keep the friendly PaaS experience they were used to, while benefiting from data hosting in France and high-quality, responsive support.
The good news: Scalingo is designed to make Heroku migrations straightforward. In most cases, you can be up and running on our platform in just a few minutes. This tutorial walks you through the process step by step.
Getting Started
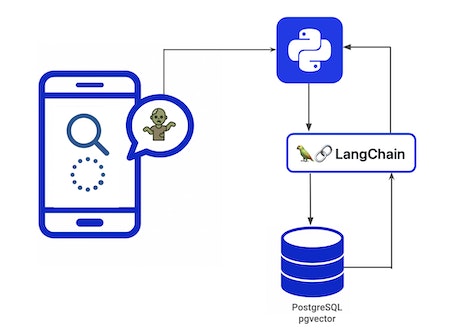
Let’s start by choosing an app to migrate. In this tutorial, we’ll work with FilmReco — a lightweight movie-recommendation app. Users type in a short description of a film, and the app returns the closest match from its catalog.
The stack is simple:
A PostgreSQL database enhanced with pgvector
For the purpose of this tutorial — and to stay as close as possible to the experience of a Heroku user preparing to move — we first hosted the app on Heroku.
If your own application doesn’t match this exact setup, no worries: Scalingo supports a wide range of languages, frameworks, and databases. You’ll simply need to adapt the next steps to your stack, but the overall process remains the same.
Now, let’s see how to migrate this application to Scalingo.
Good to know: at Scalingo, just like on Heroku, we rely on a buildpack-based system. Buildpacks let our platform automatically detect your app’s technology and install the right dependencies. They also give you the option to extend what the platform can do by using custom buildpacks.
Retrieving the app and setting it up on Scalingo
First, clone the application currently hosted on Heroku to your local machine. As explained in our documentation, here are the commands to run — just replace “filmreco” with the name of your own app:
After this step, you should have the full application code locally, including the Procfile, requirements.txt, and your environment configuration.
Next, you’ll need to create the application on Scalingo. You have two options:
Prefer a graphical interface? Log in to the Scalingo website (or sign up if you haven’t yet — your first registration comes with a 30-day free trial). From the dashboard, click “Create an app.” Give it the name you want. We’ll keep using “filmreco” for this tutorial.
Comfortable with the command line? You can use our CLI, which is the option we’ll use in this guide.
To log in to Scalingo and create the app with the CLI:
Just like Heroku, Scalingo automatically sets up a git remote for you right away:
From this point on, a simple commit is enough to deploy your application. But before we do that, let’s add a database to our Scalingo app.
Creating and setting up the database
As mentioned earlier, our demo app uses PostgreSQL — specifically the pgvector extension, which is available in our PostgreSQL offering.
If your application uses a different database, the steps will be very similar. For more details, feel free to check our documentation, which covers all the databases supported by Scalingo.
The first step in setting up our database on Scalingo is to retrieve the data from Heroku. To do that, we’ll export a dump of the database from Heroku:
On Scalingo, we now need to add a database add-on. Head to the dashboard, select your application, and open the “Resources” tab. In the Add-ons section, click “Add an add-on.” Choose the database you want and the plan that fits your needs, then follow the steps to confirm.
Once the database is provisioned on Scalingo, a DATABASE_URL environment variable will be created automatically. You can find it in the “Environment” section of your app’s dashboard.
Connect to the database using our CLI:
Finally, if you’re using PostgreSQL with pgvector like we are, you can enable pgvector directly from Scalingo’s database console:
Now that our database is up and running, there’s just one last step before deploying the app on Scalingo: adding the environment variables.
Adding environment variables and deploying
First, retrieve your environment variables from Heroku:
You can either add them from the dashboard under “Environment”, or you can set them using the following command:
Now for the fun part: your first deployment. If you’ve already deployed earlier in the process, just restart your app. Otherwise, deploy it with the following commands:
As we mentioned earlier with buildpacks, Scalingo handles everything behind the scenes when you deploy an app: it detects the runtime, installs dependencies, runs your Procfile, and starts your web processes — just like Heroku.
And that’s it! A few seconds later, our demo app is live at: https://filmreco.osc-fr1.scalingo.io/.
You can verify it for your own app by clicking “Open the app” from the dashboard.
Scalingo: the best secure European alternative to Heroku
In just a few minutes, you’re done: your application is now running on Scalingo. Moving from Heroku to Scalingo is fast, familiar, and requires no code changes — you keep the same workflow, reflexes, and habits you already know.
What’s different? You’re now benefiting from a secure, reliable, certified European hosting platform. Scalingo is ISO 27001–certified and HDS–certified, and our infrastructure is hosted in France with 3DS Outscale, who also provides us with SecNumCloud-qualified infrastructure available for our osc-secnum-fr1 region.
In short: you get the same ease of use as Heroku, plus the guarantees of a sovereign European PaaS — without lock-in.
Try it for yourself today with our 30-day free trial included when you sign up.
Need a hand getting started? Our support team is ready to help you right from your dashboard through live chat Want to talk through your needs or pricing? Get in touch with our sales team.

Fanny Dufour
Fanny began her career in media through video games. She then found her way to web development and became captivated by the broader issues that affect our digital lives. She is particularly drawn to exploring privacy, open-source tools, digital security, and the responsible consumption of technology.
Stay Updated
Get articles and platform updates in your inbox.
Ready to Deploy with Confidence?
Experience zero-downtime deployments, intelligent auto-scaling, and fully managed infrastructure. Start deploying your applications on Scalingo today.
No credit card required • Deploy in minutes • Cancel anytime